Home » Home Services
Category Archives: Home Services
How to Go About Bathroom Remodeling Without Putting a Dent in Your Wallet
The bathroom is a key part of the home and an area that often requires remodeling. A quality remodel adds functionality, enhances style, and increases value.
Changing the floor tiles and paint color can give a bathroom a fresh new look. Adding wall art and handcrafted items is a great way to add personal flair without breaking the bank. Click the Bathroom Remodeling Lexington KY to learn more.

When starting any remodel, establishing clear goals helps ensure a successful outcome. These may include upgrading aesthetics, adding functionality and enhancing energy efficiency. Then, create a budget and design a layout that fits your lifestyle.
If your bathroom is cramped and lacking storage, a common remodeling goal is to add additional cabinetry and shelving. Another popular option is installing water-saving toilets, shower heads and light fixtures to lower utility bills.
Some homeowners want to increase property value by updating the space to a more modern style. Others wish to create a spa-like space that promotes relaxation. Still, other goals are more practical in nature, such as addressing family or elderly needs by installing walk-in tubs or grab bars.
If you aren’t ready for a full remodel, try some simple updates that can make a big difference without breaking the bank. For example, new paint and refinishing existing cabinets can give the bathroom an instant facelift for much less than a complete replacement. However, if you do plan to do a larger project, consider the budget and timeline carefully to avoid budget overruns. Also, don’t skip any necessary steps like obtaining permits or removing and replacing the first four feet of drywall.
Set a Budget
There are many ways to remodel your bathroom without putting a dent in your wallet. Ripping everything out and starting from scratch can be expensive, so it’s important to have a budget in place. Aim to refresh what you have rather than replace it, as this can reduce costs significantly. For example, refinishing your bathtub is much less expensive than buying and installing a new one. A fresh coat of paint can also drastically change the look of your bathroom for a fraction of the cost. Other easy, budget friendly upgrades include updating the mirror, replacing lighting fixtures and adding stylish flooring.
The amount of work needed to complete your bathroom remodel will also factor into the budget. Generally, the bigger the scope of work, the higher the labor costs. This is especially true when transforming a tub into a shower, changing the layout of the bathroom, or removing walls.
It’s also important to get multiple quotes from contractors and make sure you are getting the best value for your money. Don’t just choose the cheapest option as that could lead to substandard quality in the finished product. Provide each contractor with thorough documentation so that they can accurately quote you.
Hire a Contractor
A good contractor is the single most important person in a remodel, especially when it comes to the bathroom. They’re the point-person, troubleshooter and expert guiding your project through to completion.
It’s always a good idea to interview several contractors before selecting one to work on your NYC bathroom remodel. By doing so, you’ll get a variety of viewpoints, as well as competitive bids.
When interviewing contractors, homeowners should ask about their experience in bath remodeling as well as their qualifications and certifications. A trustworthy contractor will be more than happy to provide this information and may even have client references available.
Homeowners should also ask each contractor about the timeline for their remodel. The duration varies based on the scope of work, with smaller projects taking less time than larger ones.
Once a homeowner has selected a contractor, they should sign a contract with them to get started on the project. This contract will outline the cost and timeline for the bathroom remodel. This can include details like when the first payment will be due and how much progress will be made before a final payment is due. It should also cover unforeseen expenses like permitting fees and board approvals, if necessary.
Get Permits
If you’re doing a major bathroom remodel and changing structural components or plumbing fixtures, you will need to get a permit from the Department of Buildings (DOB). This ensures that your renovations comply with NYC building codes and uphold safety standards. Non-compliance can result in fines and legal issues. It can also cause problems when you try to sell your home.
However, cosmetic changes do not require a permit. Swapping out surfaces (tile, floors), light fixtures, and appliances will likely not need a permit, as long as they don’t involve rerouting the plumbing lines. Replacing a toilet may not require a permit, as well, if you’re using the existing drain and trap.
When a permit is required, it’s important to clearly define the scope of work to avoid complications. It’s also essential to understand local building codes and regulations, which vary on a town-by-town basis. A qualified architect or contractor can help you navigate these guidelines.
Demolition
During the demolition phase, old materials are removed from the bathroom to make way for new ones. This is typically a time-consuming process, but it’s necessary for the success of your remodel.
Before starting, you’ll want to make sure that the power and water are turned off. This will protect your home from any accidental damage, and it will also prevent expensive flooding should you accidentally hit a pipe while demolishing the bathroom. You’ll also want to know where your service metres are, particularly your water metre. This will allow you to turn off the water source if you accidentally damage it during the demolition process, which can save you thousands in flood damages.
Demolition is a messy job, and it’s important to take the proper precautions. It’s recommended that you wear gloves, safety glasses, and a dust mask to avoid inhaling any toxins or mold. It’s also a good idea to rent a residential dumpster so you can dispose of the demolition debris quickly and efficiently.
It’s also important to understand the difference between remodeling and renovating. A simple bathroom upgrade that doesn’t change the layout or structure of the room is considered a renovation project, while a full remodel requires gutting the existing space down to the studs and rebuilding it.
Rough-In
During the rough-in stage, plumbers install your home’s initial piping for water supply, waste lines, and vents. They do this before drywall or insulation goes up, which is why it’s important to get the dimensions right. A properly-sized bathroom will offer optimal usage and comfort, and a poorly-sized one could result in costly adjustments and repairs down the line.
In addition to ensuring that your plumbing will function as it should, the rough-in phase also establishes a foundation for your fixtures. This helps ensure that they’re positioned correctly and have adequate clearance to prevent future issues. It’s also a critical step for ensuring that your finished product meets code and safety standards.
Whether your plumbing is being installed in an existing home or on new construction, you can expect to spend several days or weeks completing the rough-in process. This is because the plumbing will need to be connected to your home’s main plumbing line before any wall finishing can be done. This step also involves determining how your pipes will be run through the walls and floor, which includes making decisions about what materials to use. The most common options include copper or PEX piping.
Finishing
At this point, you’ll start to see the new bathroom take shape. During this phase, new cabinets, sinks, fixtures, and tiles are installed. In some cases, there may be a need to rework the plumbing and electrical based on the final layout. This can add to the overall cost and timeline of the project.
If you are using a contractor for the remodel, they should have a kickoff meeting to discuss your goals, and to take measurements and photos of the space. This will help them develop a design and budget for the renovation.
It’s also important to consider what features you’d like to include in the remodel. For example, adding a walk-in shower to replace a bathtub can improve accessibility and increase value to the home. If you’re considering selling your home in the future, this could be a big selling point for prospective buyers.
It’s also a good idea to incorporate the basics of Universal Design into the new bathroom. These changes can make the bathroom more accessible for people with disabilities, and they can also reduce energy costs and increase comfort. Including things like grab bars and wider doorways can increase safety, while adding things like a heated floor or voice-activated lighting can improve comfort.
Ceiling Repair – How to Identify Common Ceiling Problems
Incorporating ceiling repair into routine home maintenance reduces the occurrence of damage. Inspecting the underlying structure of ceilings, such as examining trusses and wood components, can also prevent structural issues from developing.
Professionals are best equipped to handle extensive or structural damage to the ceiling, including identifying its cause and addressing it accordingly. They may also be able to coordinate specialists involved in the process. Click the Ceiling Repair Perth to learn more.

Over time, virtually all homes develop cracks in the ceiling. Most are cosmetic in nature and don’t indicate structural problems. But some cracks -especially those wider than 1/8 inch- may be a sign of underlying issues that need to be addressed as soon as possible. Examining the shape, size, amount and location of the cracks will help you determine the cause.
A fine straight crack, for example, often indicates that a joint wasn’t taped properly. This is easily fixed with a little drywall compound. A wide crack, on the other hand, could be a sign of serious settling and foundation damage. In these cases, you’ll need to consult with a professional and have the situation assessed.
Cracks where the wall meets the ceiling are typically caused by temperature changes or by improper drywall installation. This type of crack can usually be fixed by patching the area with drywall compound or a high-hiding paint. In some cases, the cracks will need to be re-taped and skim coated with a fresh coat of joint compound.
If the cracks are traveling across the ceiling or down the walls, they are a clear sign of significant structural damage and should be considered urgent. Traveling cracks often suggest that the structure is shifting, causing the ceiling to sag. This can be due to a number of causes including water damage, heavy weight on the floor above, and foundation settlement.
A gap or sag in the ceiling can also be caused by a problem with the support beams and joists in the attic, which could require some structural repairs. Having a professional assess the issue is best to ensure that any structural issues are treated promptly and efficiently to avoid long-term damage or ceiling collapse.
Water Damage
Water damage to your ceiling is a homeowner’s worst nightmare. Not only does it look unsightly, but it can lead to rot and mold growth, as well as weakening the structure of the house.
It’s essential to fix any water damage as soon as you notice it. The longer you wait, the more the material will deteriorate, compromising its structural integrity, endangering your health, and fostering microbial growth.
One of the first signs of water damage on a ceiling is brown patches or dirt lines. These are caused by water soaking into the plaster and drywall, causing them to discolor. It’s also common to see water stains that resemble mildew. Brown stains on the ceiling aren’t just unsightly, but they can be dangerous, leading to mold and mildew growth that can spread throughout the home, affecting other parts of the building.
Another sign of a damaged ceiling is the musty smell of rot and mold. It’s important to get these stains repaired as quickly as possible to prevent the mold from spreading, which can cause serious health issues and require extensive repairs.
If your client’s ceiling has been impacted by water, you should start by finding the source of the leak. This can be as simple as a roof leak, which may be caused by faulty shingles, or more severe water damage from flooding, plumbing issues, or other factors.
Once you’ve fixed the source of the problem, it’s important to properly dry the ceiling and any areas that were affected by the leak. You can use fans or dehumidifiers to help the process along, and ensure there’s no moisture left behind in the ceiling cavities.
It’s also vital to ensure that any woodwork or electrical wiring that was impacted by the water is completely dry before beginning any repairs. Moisture in these components can lead to rot and electrical problems, which will be costly to repair and may pose a safety hazard for the home’s inhabitants. The best way to test for moisture in these materials is to re-inspect the area once it’s dry.
Structural Issues
The ceiling, an integral component of the structural integrity of a home, experiences significant wear and tear over time. Vigilant inspections can help identify and address problems before they escalate, minimizing associated damage and repair costs. Whether ceilings are constructed of drywall, plaster or another material, each type has unique maintenance and repair needs. Recognizing common issues, such as cracks, stains, and sagging, can help homeowners determine the appropriate repair approach.
Normal, non-structural cracks in the ceiling typically appear as thin, uniform hairline fractures that do not worsen over time and are triggered by natural building movement and settling. These cracks are usually cosmetic and can be repaired using joint compound or drywall mud patching. In contrast, larger and recurring cracks are often a sign of serious structural issues that require professional remediation.
Structural cracks in the ceiling can result from a variety of factors, including heavy objects falling or being dropped on the surface, excessive loading from appliances, accumulated belongings, and foundation settlement. Additionally, the location of the crack is a critical factor in determining its severity and urgency. Cracks that are confined to a single area or run along a drywall seam may be caused by inadequate taping and mudding during construction.
Similarly, cracks that are long, wide, and accompanied by sagging are often a sign of structural damage. This type of issue is more likely to occur if there is an additional load on the structural components above, such as from a bathroom or storage room located directly above the cracked ceiling.
Structural repairs for ceilings are best conducted by a qualified contractor who can accurately assess the root cause of the problem. For example, a structural crack that extends from the floor to the wall is most likely the result of poor connections between floor joists and the foundation piers. The most effective solution is to correct the connections, such as hurricane ties for uplift, clips or nails for blocking parallel to walls, anchors for transfer of load from walls to foundations, and real post to pier connections.
Poor Installation
The ceiling is a vital part of any home’s structure, so it’s no surprise that it can be damaged for a number of reasons. Whether it’s water damage, cracks, or a sagging ceiling, prompt action is essential for maintaining the integrity of your home and preventing further structural problems.
Water damage to your ceiling can occur for a number of reasons, including leaks from the roof or plumbing, overflowing bathtubs and toilets, or flooding caused by heavy rains. It’s important to identify and repair the source of the water to prevent further damage to the ceiling and other parts of your home. If the ceiling is affected by a large amount of water or there are severe cracks, it may be necessary to remove and replace the damaged section. A professional contractor can provide advice on the best course of action.
Cracks and holes in your ceiling can be unsightly and a sign of more serious problems, such as structural damage. In addition, they can affect your energy bill by allowing warm or cool air to escape into the space between floors and walls.
Generally, small cracks and holes can be patched using drywall compound or joint tape. After waiting at least 24 hours for the patched areas to dry, sand them smooth and apply a coat of primer and paint. If you choose to repaint the entire ceiling, a high-quality, stain-blocking paint will ensure a long-lasting finish that resists moisture and mildew.
In older homes with plaster ceilings, a sagging ceiling may be due to foundation settling or poor construction, while in newer homes, it could be the result of improper installation of gyprock (drywall). A professional can inspect the ceiling and recommend an appropriate solution. In the short term, timber battens can be attached to the joists to temporarily support the ceiling until a permanent solution is put in place.
For larger cracks, water damage, or sagging, it’s important to hire a professional contractor or drywall repair contractor. They specialise in these types of repairs and will ensure a quality job that lasts. Look for a contractor with good references, experience, and licensing. Ask family and friends for recommendations and read online reviews before selecting a contractor. Avoid hiring a company that offers the lowest quote as this may compromise the quality of work.
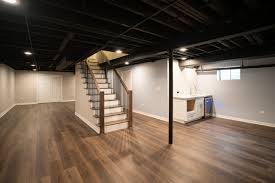
How to Make the Most of Your Basement Remodeling Project
If your basement is a catch-all for plastic bins and boxes, organize the clutter with floor-to-ceiling shelving that tucks items away. To avoid obstructing plumbing and electrical lines, opt for a drop ceiling instead of leaving them exposed.
A few key upgrades can transform your basement. Consider adding a wet bar to entertain guests or a wine cellar to show off your vino collection. Contact Basement Remodeling Tacoma WA now!
Before starting your basement remodel, you should plan your project thoroughly. This includes determining what your objectives are and how you hope to use the space. You will also need to consider any potential issues, such as moisture problems and structural concerns. You should also contact your local building authorities to ensure you comply with the necessary regulations. For example, some remodeling projects may require a permit if you are changing the floor plan or adding plumbing and electrical.
One way to start planning is to look at the existing layout and see how you can improve it. This can include changing the layout of rooms, refinishing floors, installing new windows and doors, and more. You can also decide on a color palette, furniture and decorative elements to make the room feel more like an extension of your home’s main living spaces.
Another important factor in basement remodeling is the selection of materials. Moisture is a major concern in basements, and it is important to choose materials that will resist mold and mildew. Additionally, you should select flooring that will be comfortable underfoot and easy to clean. Carpet is often a bad choice, but vinyl or laminate can be more durable and attractive in the basement.
For lighting, you should consider both ambient and task lights. Basements can be quite dark, so it is important to install adequate lighting. Additionally, recessed lighting can create a more finished appearance in the space and add an extra layer of warmth. You should also think about putting in some accent or bias lighting.
Another consideration in basement remodeling is the addition of a bathroom or kitchenette. It is important to remember that you may need additional plumbing and electrical wiring, which will add to the cost of your renovation. Additionally, it is essential to adhere to local zoning laws when adding a basement bathroom or kitchenette.
The best time to complete a basement remodeling project is during the off-peak seasons for construction, which are typically late winter and early spring. This will help you save money on labor and materials. In addition, working during these times will allow you to enjoy your new basement before the summer weather arrives.
Layout
A basement remodel is an excellent way to create a livable space for entertaining, relaxing, or working. It also adds value to a home and can often be completed for less money than adding on. To make the most of a basement renovation, it’s important to start with a well-thought-out design plan. This will help you identify the project’s scope and determine if it requires professional assistance. In addition, it will allow you to determine whether the framing, plumbing, and electrical systems can be adapted to accommodate the new layout. During this stage, it’s important to examine the existing plumbing lines (supply and wastewater) to see what changes can be made without tearing down walls or disturbing any pipes. It’s also a good idea to consult with an electrician to evaluate what modifications can be made and any additional work that might be needed.
Once the design is finalized, you can begin constructing the basement walls. It’s best to insulate and drywall the walls before installing any appliances or finishing the flooring. This will prevent the drywall from becoming damp or moldy. You should also leave a hole for any future plumbing, air duct, or electric work that will need to be installed later. If you are planning to turn the basement into a bedroom, remember that it will need an egress window to meet safety requirements and allow first responders to enter in case of an emergency.
Before beginning the basement remodeling, it’s a good idea to find a licensed contractor. Many remodeling projects, such as modifying walls and installing HVAC systems, are not suitable for DIYers. If you don’t have the experience or proper tools, you could end up with subpar results or a dangerous situation. An experienced contractor will have crews who can complete the work more quickly and will be familiar with local regulations regarding wall construction, plumbing, and electricity.
If you are planning to use the basement as a multifunctional room, consider incorporating built-in storage solutions into the design. This will keep the space clutter-free and give it a more attractive look.
Materials
Choosing the right materials for your basement renovation is essential for both aesthetically pleasing results and long-term durability. The right materials are not only a great way to enhance the style of your finished basement, but also help you save money on utilities and maintenance. In addition, some basement finishing materials are more resistant to moisture than others, which is a major consideration for many homeowners.
Framing is a crucial step in any basement remodeling project. It provides a framework for installing drywall and other wall materials, as well as the structural support for your ceiling. When framing, be sure to use studs that are both strong and moisture-resistant. The best choice is a wood-based material with an R-13 insulation rating or a product that can easily be insulated.
Once the walls are framed, it’s time to insulate your basement. This will help keep the space warm in the winter and cool in the summer. Insulation also helps reduce noise levels and is a must for basements, especially those that are livable spaces. If you choose to use a hard-board insulated wall panel, be sure it’s mold-resistant and has an R-13 insulation rating.
Next comes the flooring. There are a variety of different flooring options, but waterproof vinyl plank is the most popular. This type of floor is durable, comfortable underfoot and offers a wide selection of designs and textures to fit any style. It is also water-resistant and can withstand the effects of colder basement temperatures.
Another important aspect of your basement finishing project is the trim and lighting. Thoughtful overhead lighting will highlight cabinets and design features, while accent and bias lighting will illuminate a new bar area or create an inviting home theater experience. It is a good idea to leave pipes, wiring and ducts visible rather than hiding them behind a drop ceiling. This will allow you to easily access them in the future, should the need arise.
The final steps of your basement remodel include the installation of appliances and furniture, as well as the final touches. This can make the space feel like a true extension of your living space and can add value to your home. If you decide to sell your house in the future, a finished basement can increase its resale value and attract potential buyers.
Budget
If you’re one of the 38 million homeowners in the United States with a basement, it’s time to make the most of this overlooked space. The possibilities are limitless, from a home office to a bedroom or even a fitness studio. The biggest factor, though, is your budget. This is why it’s important to set realistic expectations before starting a basement remodeling project. The good news is that a basement renovation can be significantly cheaper than adding on to the main level of your house or buying a new property altogether.
You’ll need to consider a variety of factors, including the type of remodel and how many rooms you’re planning to add. The cost of the materials you choose will also impact your budget, with higher-end products and fixtures often costing more than their less expensive counterparts. If you’re remodeling a large area, you’ll also need to include the cost of electrical and plumbing work. It’s best to hire professionals for this part of the job, as they can complete the work more quickly and effectively than DIYers.
It’s also essential to factor in any additional costs, like building permit fees and plumbing and electrical inspections. If you’re remodeling a boiler room or laundry room, be sure to work with vendors familiar with local codes so that your finished basement meets inspector approval, avoiding tear-outs and costly delays. You should also check that contractors are licensed in their fields. Many states require specialty trades like plumbers and electricians to maintain specific licenses.
When planning your budget for a basement remodel, remember to leave money in reserve for unexpected expenses. Even minor repairs can tack on several thousand dollars to the total bill. You should also test for moisture before beginning the renovation process, as covering up damp walls or ceilings will lead to costly repair bills down the road.
It’s also important to understand that finishing a basement is a complicated job, and it requires a lot of knowledge and experience to get the results you want. It’s a good idea to work with a design-build team that has experience in this field and can help you create a viable plan that will fit within your budget.
When to Hire a Professional Home Repair Service
Whether fixing a leaky faucet or repainting a room, home repair projects can be rewarding. However, it’s important to know when to seek professional help.
Some repairs require advanced knowledge and skills, such as repiping a bathroom or replacing a furnace. Attempting these tasks without the proper expertise can lead to expensive mistakes or safety hazards. Click Here to learn more.

Home repair is unavoidable in homeownership, but many people attempt DIY projects rather than hiring professionals. This can be a costly mistake, as the quality of DIY work is often poor and may cause additional damage to your property. Professionals, on the other hand, have years of experience and extensive training in a variety of home repair tasks. Moreover, they have access to a wide range of tools and equipment that help them tackle complex repairs more quickly and effectively.
Professionals are dedicated to delivering high-quality workmanship, which can help them avoid costly mistakes and save you money in the long run. They also understand local building codes and regulations, so they can make sure that your home repair project is up to code. They can also recommend energy-efficient upgrades that will save you money on utility bills in the long run.
When you hire professionals to perform home repairs, they will complete the job in a timely manner. This can be a significant time savings for you, as it allows you to return to your regular routine sooner. Additionally, professionals can often complete home repair tasks with a greater degree of accuracy than DIY enthusiasts, reducing the risk of error and enhancing the value of your property.
Moreover, professional contractors are well-versed in the intricacies of different types of home repair projects, including plumbing, electrical, and structural alterations. In addition, they know how to handle hazardous materials and are familiar with the appropriate safety precautions. Attempting these tasks without the right knowledge and skills can be extremely dangerous for you and your family, so it’s best to leave them to the experts.
Moreover, many DIY enthusiasts are not properly trained in structural repairs, which can lead to serious accidents and injuries. In addition, improper DIY work can significantly reduce the value of your home and result in further damage to the property. Therefore, if you are planning on selling your home in the future, it’s best to hire a professional for most of the home repair and renovation tasks.
License
When it comes to home repair, there are certain tasks that are best left to professionals. These include plumbing, electrical work, structural alterations and roofing repairs. Trying to do these jobs yourself could lead to costly mistakes and safety hazards. Additionally, improperly done repairs can damage the value of your home or even cause permanent damage. Professionals have the skills, knowledge and experience to handle these jobs safely and efficiently.
Many people consider themselves able to perform basic home repairs on their own. This may be true for some tasks, but others are so complicated, time-consuming or dangerous that it’s better to leave them to the professionals. It can be easy to get caught up in the DIY spirit and think that you can tackle any task, but this is not always the case. Many tasks require specialized equipment and expertise that is beyond the skill level of most homeowners. Attempting to perform these tasks without the proper training and experience can lead to expensive mistakes and safety hazards.
In addition to being qualified and experienced, a professional should be licensed in your area to perform home improvement services. This ensures that the company you hire is reputable and has passed background checks. It also means that they are insured, which protects you from being held liable for any damages caused by their workers.
There are a number of ways to verify a professional’s license, including contacting your local government or checking online. In the state of New York, it’s a crime to provide residential services without a valid license, and violators can face fines, civil penalties, or even jail time. The Department of Consumer and Worker Protection has deployed teams to inspect home improvement contractors, and has found more than 460 companies working without a license.
Home repairs can be complex, and attempting them on your own can be dangerous. Professionals have a wide range of skills and expertise that they have acquired over the years, and are well-versed in the intricacies of various home repair tasks. They can also offer valuable advice on how to improve the performance and appearance of your home, and help you avoid costly mistakes.
Insurance
A professional home repair service should carry adequate insurance to cover the cost of any repairs or replacements. This insurance should include worker’s compensation and general liability. You should also check if the company is bonded, which means they set money aside to pay for any disputes or settlements. This is important in the event that you are unhappy with the work or have a dispute with the company.
A home warranty is a contract that provides financial protection for homeowners against unexpected system and appliance breakdowns. It usually covers a wide range of appliances and systems, from HVAC and plumbing to garbage disposals and garage door openers. Different providers offer a variety of plans, including tiered and build-your-own options. It’s important to review each plan’s specific terms and conditions to ensure you are covered for the type of repair or replacement that you need.
A good home warranty provider will be available around the clock to help with any emergency situations. It’s essential to consider if the company has an online customer portal that allows you to submit claims and access policy terms 24 hours a day, seven days a week.
Reputation
Professionals in home repair have a well-established reputation that they work hard to maintain. This is due to their extensive training and hands-on experience in a variety of home repair tasks, from plumbing to electrical work, roofing repairs to carpentry, and drywall installation to repairing foundations. Professionals know the intricacies of each task and can ensure it is done correctly and safely. They can also help you save time and money by avoiding unnecessary or costly mistakes.
When choosing a home repair professional, it is important to ask for references from previous clients. This will allow you to determine if they were able to complete projects on time and within budget. You should also check to make sure that they are licensed and insured before hiring them.
While some household tasks may be better left to DIYers, there are certain jobs that should always be handled by professionals, including plumbing, electrical work, structural alterations, roofing repairs, gas-related fixes, and major remodels. Attempting these types of tasks without the proper expertise can result in costly mistakes, safety hazards, and property damage. If you are unsure whether a job should be performed by a professional, consult with a local contractor for a consultation.
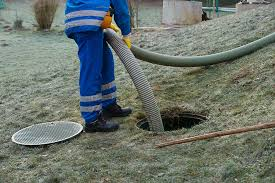
Why Septic Tank Services Are Necessary
Septic tanks and septic systems provide an alternative to centralized sewer systems. Regular cleaning and inspections help ensure the system’s integrity. Click the Septic Tank Services Near Me to learn more.
Septic tanks separate solids from household wastewater. Heavy solids settle to the bottom of the tank as sludge, and lighter, fat-soluble solids rise to form a layer of scum. The liquid sewage flows to the soil absorption field for final treatment and purification by microbes.
Properly installing your septic system is important to avoid costly repairs and maintain optimal efficiency. The installation process typically begins with a site evaluation by a licensed site evaluator to determine the best type of septic system for your property. The evaluator performs measurements and tests to find out the soil composition, water table levels, and other factors that affect the performance of your septic system. Then, the engineer will design a septic system for your site. After obtaining the necessary permits, your septic tank company will purchase materials and install your septic system. They will carefully excavate the area for the septic tank and drain field, following the design specifications to ensure efficient waste treatment and dispersal.
Once the wastewater enters the septic tank, it is treated by bacteria that digest the germs and other microorganisms in it. Then, the clear liquid exits through the outlet pipe into the leach field or absorption field. This network of gravel-filled trenches contains perforated distribution pipes scattered throughout the soil, where it is slowly absorbed into the ground. Some of the wastewater will evaporate into the air, while the rest is absorbed and safely carried away to the nearest water body.
If your septic tank is overflowing or you notice strong sewage smells around your home, contact a professional for help. If not properly disposed of, septic systems can produce dangerous gases that may cause health and safety issues. These toxic fumes can also leak into the environment and pose a risk to children, pets and wildlife.
During the septic tank installation process, your contractors will need to access and use heavy equipment like backhoes and excavators. They will mark and locate any underground utilities before excavation to prevent any damage or injury to the workers. They will also take care to protect the environment by using appropriate safety gear and taking precautions such as wearing rubber gloves, safety glasses, and dust masks.
After the excavation is completed, the septic tank will be carefully lowered into the hole. Next, the septic tank inlet and outlet pipes are installed and connected to the house plumbing and the drain field. Finally, the septic tank and pipes are backfilled and compacted carefully to ensure proper functioning and to avoid future problems such as clogs or leaks.
Inspection
The septic tank handles wastewater in homes that aren’t connected to municipal sewer lines. It’s a complex system that manages waste and treats it. Regular maintenance can keep it working properly, but septic tank problems can cause problems for the entire plumbing system and property. A septic inspection is a necessary step in the maintenance process.
Inspectors will look for cracks in the tank. They will also check the condition of the inlet and outlet baffles. These are regulatory valves that ensure the septic tank is watertight. A leaking septic tank could pollute surface and groundwater and reduce the separation time needed to discharge clear wastewater into the drain field.
A septic inspector will also check the level of sludge in the septic tank and determine whether or not it’s at capacity. The septic tank is designed to hold only a certain amount of sludge and scum, so when these materials reach the top of the tank it’s time for a pumping.
Other components the inspector will examine include the floats and pumps in the septic tank. The floats must be positioned correctly to trigger at the proper levels of wastewater flow. The pumps are inspected to ensure they are operating correctly and that they are triggering at the correct levels as well. The inspector will also inspect the drain field, ensuring that there are no signs of standing water or that it is clogged.
In addition to visual inspections, the septic inspector may conduct flow tests and load tests. In a flow test, the septic inspector will flush a non-toxic dye through the system to visually track its path and spot any issues that need to be addressed. In a load test, the inspector will inject a significant volume of water into the system to simulate heavy usage and identify any potential problem areas.
Homeowners can help prevent septic tank problems by using water efficiently and only flushing biodegradable products. Items to avoid flushing include dental floss, feminine hygiene products, condoms, cotton swabs, coffee grounds, cat litter, paper towels, grease, oil, gasoline, pesticides, antifreeze and paint.
Repair
When wastewater flows into the septic tank, solid waste settles at the bottom and lighter materials float to the top. Over time, these solids can build up to a critical point, reducing the space for new wastewater to enter and leading to clogs in your home’s drains. Pumping the septic tank removes these accumulations, keeping them from reaching this point and minimizing the risk of clogs and backups.
During this process, your septic system professional will also check that the baffles are in good condition and properly installed. He or she will also examine the inlet and outlet pipes, as well as the septic tank cover, and any cracks or damage that may require repair. The septic system professional will then use water to wash the walls of your tank, removing any sludge that remains. He or she will then replace the access lid and reburies it, as well as add a riser to lift the lid above ground level for easier maintenance in the future.
Once the septic tank has been pumped, the septic system professional will discard the sludge and scum in an environmentally safe manner. The septic system professional will then backfill around the tank, as well as test the water flow to ensure that the septic tank is functioning properly. The septic system professional will also note the sludge and scum levels in your septic tank to help you keep track of when it’s time to have it pumped again.
A septic tank can last for many years, but it requires routine maintenance and inspection to remain in good condition. If you have a septic system, stick to a regular schedule of pumping and maintenance and contact your septic service provider if you notice any signs of trouble, such as slow draining in the house, sewage bubbling up from toilets or sinks, or foul odors. Contacting your septic company to have the tank repaired or inspected can prevent costly problems down the road. If you have a complaint or dispute with your septic system company, filing a complaint with the state’s attorney general’s office or the Better Business Bureau may be beneficial.
Maintenance
Septic tank maintenance involves a variety of activities, including regular tank pumping, inspecting the system components, and grease trap cleaning. It also includes preventing clogs and identifying and repairing problems before they lead to serious septic tank failure. Residential septic tanks typically need to be pumped every two or five years, depending on the size of the tank and how many people live in the home.
During the pumping process, a technician will use a high-powered hose to remove the septic tank sludge. Then, the technician will clean the septic tank’s baffles and check the drain field for signs of clogs or other issues.
Some homeowners can prevent septic tank problems by keeping certain items out of the septic tank and drain field. Household hazardous products, such as paint, automotive fluids, and lawn pesticides, can interfere with the natural bacterial breakdown process in the septic tank and contaminate groundwater. In addition, homeowners can help to reduce septic tank problems by keeping water usage low, planting trees and shrubs far away from the septic system, and cleaning drains regularly.
When you hire a professional to perform septic tank maintenance, it’s important that they be familiar with local septic regulations and practices. This will ensure that the work is done according to the appropriate standards and laws. If your septic tank is located on property owned by someone else, make sure that the owner knows about the tank and is aware of any potential maintenance and repair needs.
If you have a septic tank that is overflowing or has other severe problems, the septic tank repair process may take longer than normal. This is because the contractor will need to excavate and replace parts of the septic tank and drain field, which takes more time than standard maintenance. In addition, if the problem is serious enough, your local government may require that the septic tank be replaced altogether.
The best way to keep your septic tank in good condition is to schedule routine septic tank pumping and inspection services. These services can catch problems before they become costly and dangerous. You should also keep in mind that your septic tank will need to be pumped more often if you have a large household or frequently use toilet paper, laundry detergents, and other harsh chemicals.